
- Library Membership
- Borrowing Privileges
- Renew
- Return
- Book Delivery Service (Inter Campus)
- Inter Library Loan (ILL)
How to Use AU-IR
What is AU-IR
AU-IR (Assumption University Institutional Repository) is a digital service provided by the university to support the management, preservation, and dissemination of scholarly and creative works produced by members of the AU community. The primary goal is to collect, preserve, and share the academic and intellectual output of the university, making it widely accessible to the global academic community. We are fully committed to the stewardship of all AU academic works in digital format—ensuring their proper organization, open distribution, and long-term preservation.
AU-IR is an open-access repository, which means that its content is freely available online and can be discovered through general search engines such as Google. According to the definition, “Open-access (OA) literature is digital, online, free of charge, and free of most copyright and licensing restrictions.”
At present, very few of the following types of academic materials are being submitted to AU-IR:
• Previously published works (e.g., journal articles, book chapters)
• Research and teaching publications
• Data files and databases
• Conference proceedings and unpublished scholarly works
• Working papers and technical reports
• Journal articles
We encourage all faculty, researchers, and students to contribute to AU-IR and help build a comprehensive and enduring academic archive for Assumption University.
Submit to AU-IR
Register
Step 1: Go to https://repository.au.edu/
Step 2: Click Login, then click New User? Click here to Register
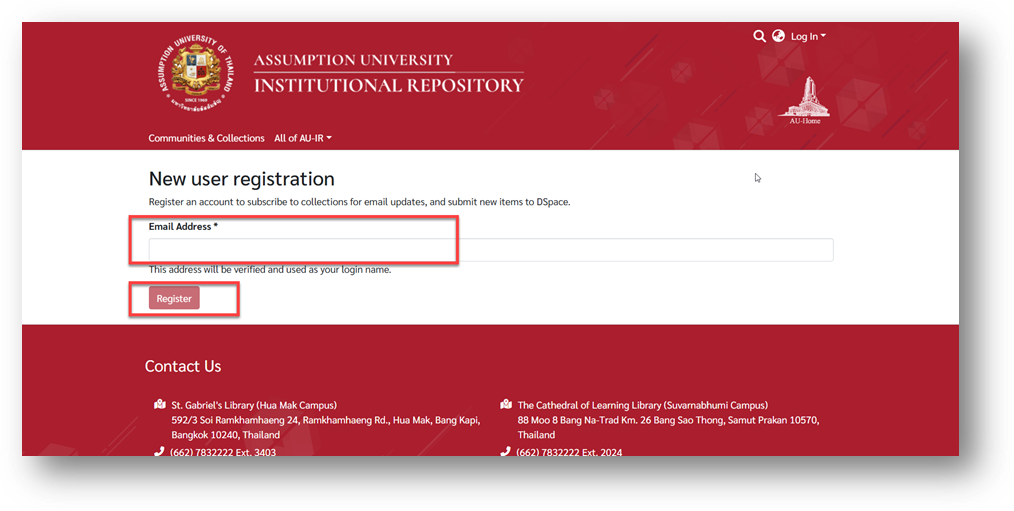
Step 3: Enter your AU Email Address and click Register
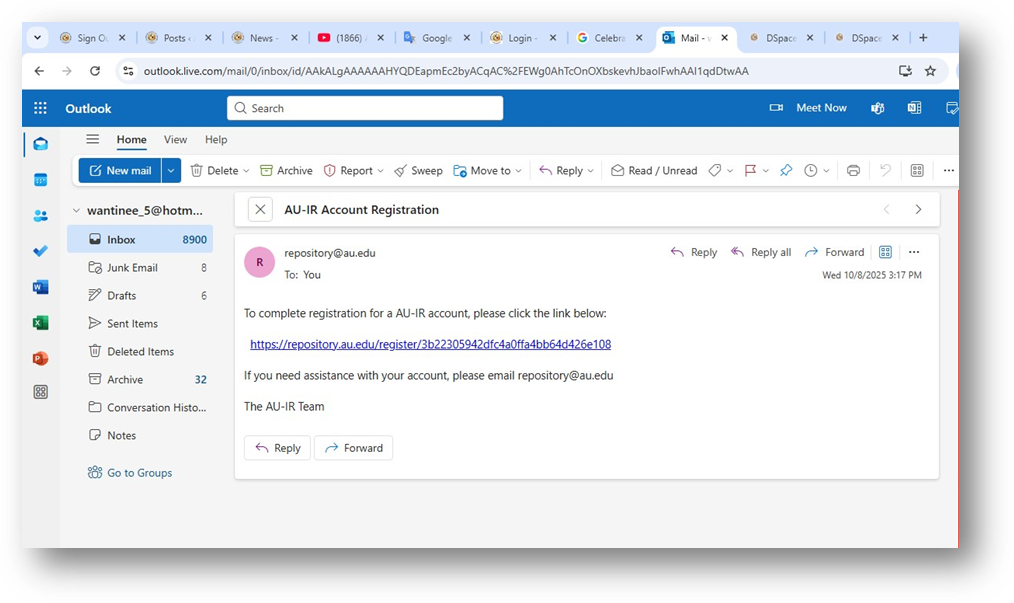
Step 4: You will receive an email from the system. Follow the instructions and complete the Registration Form
Step 5: The system administrator will contact you by email to ask which Community and Collection you wish to submit items to, in order to grant the appropriate access rights.
Submit Your Work Item
Step 1: Go to https://repository.au.edu/
Step 2: Click on the Login menu
Step 3: Enter your Email Address and Password
Step 4: From the left-hand menu, select New Submission and then click Item
Step 5: In the field Create a new item in, search for and select the desired Community and Collection
Step 6: Complete the Describe Item section and upload your files
Step 7: Click on DepositGrant License)
How to Search
Step 1: Go to https://repository.au.edu/
Step 2: Use the Search Box on the AU-IR homepage
Step 3: Enter a keyword in the search bar (e.g., title, author, subject, or topic)
Step 4: Click Search
If you have any questions, please contact the AU Library (Extension: 3403).
Register AU-IR
AU-IR Registration for Material Submission
Step 1 — Access AU-IR
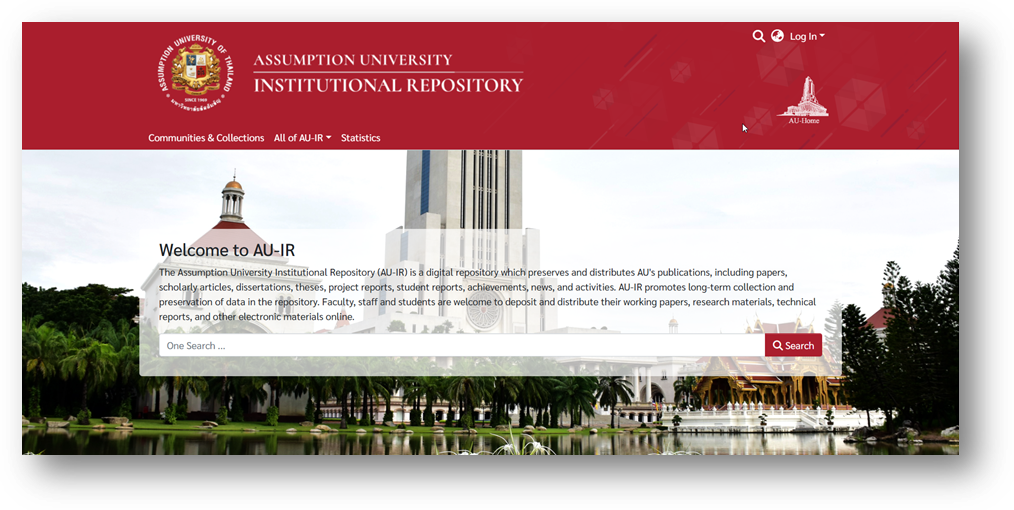
Begin by accessing the AU-IR system through one of the following channels:
-
Library Website: https://library.au.edu
Step 2 — Log In
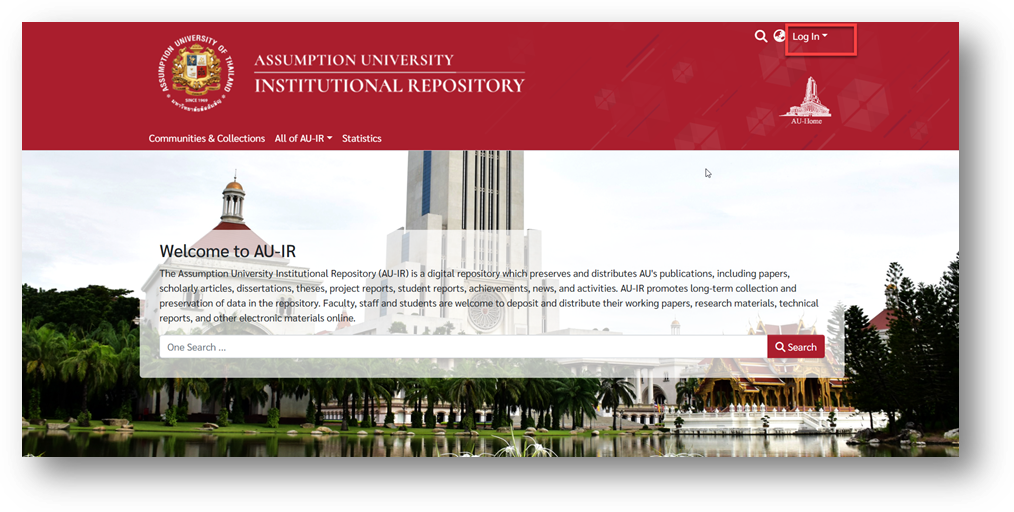
Click “Log In” at the top-right corner of the AU-IR homepage.
Step 3 — New User Registration
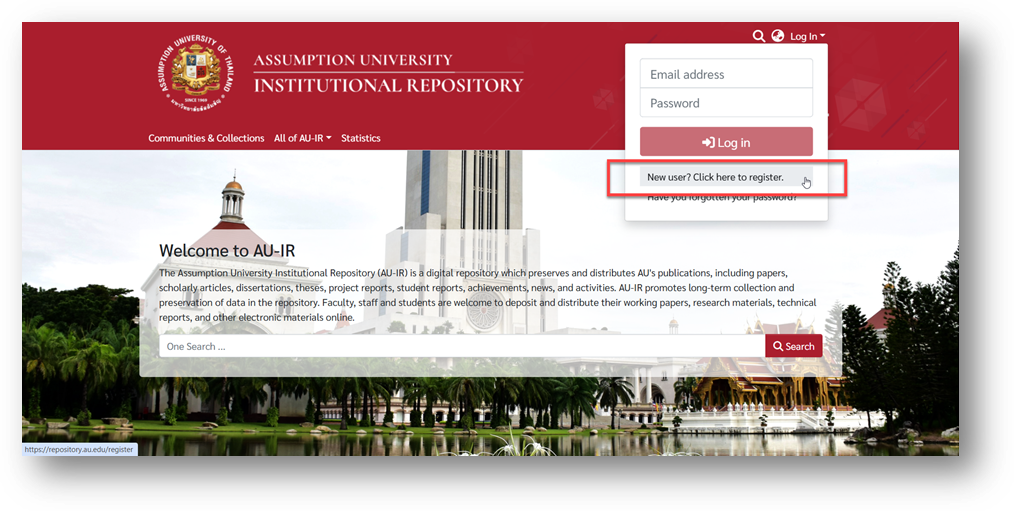
Select “New user? Click here to register.”
Step 4 — Enter Your AU Email
Type your AU email address (must end with @au.edu) and click Register.
Step 5 — Verify Your Email
Check your inbox for the AU-IR Account Registration email and click the verification link.
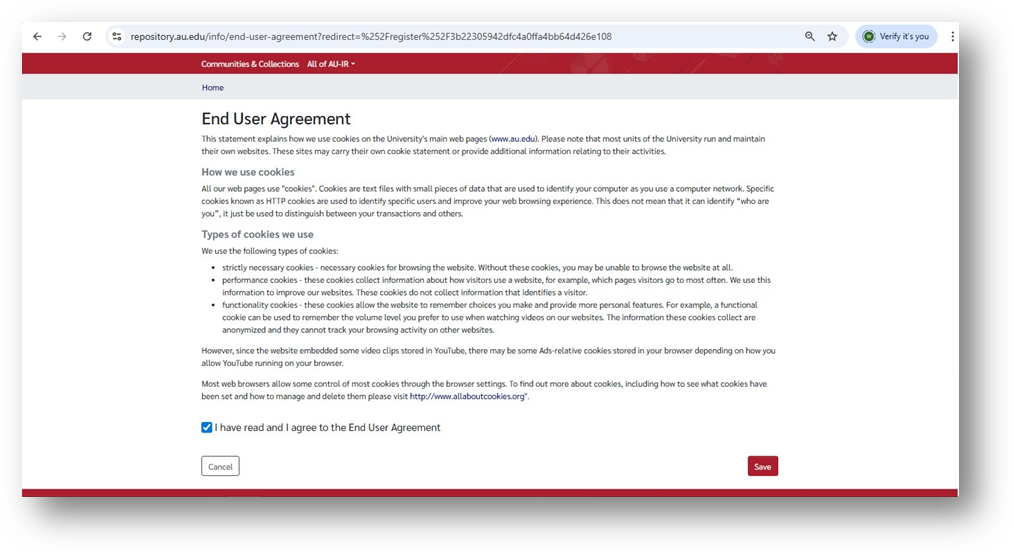
Step 6 — Agree to Terms
Tick the box “I have read and I agree to the End User Agreement”, then click Save.
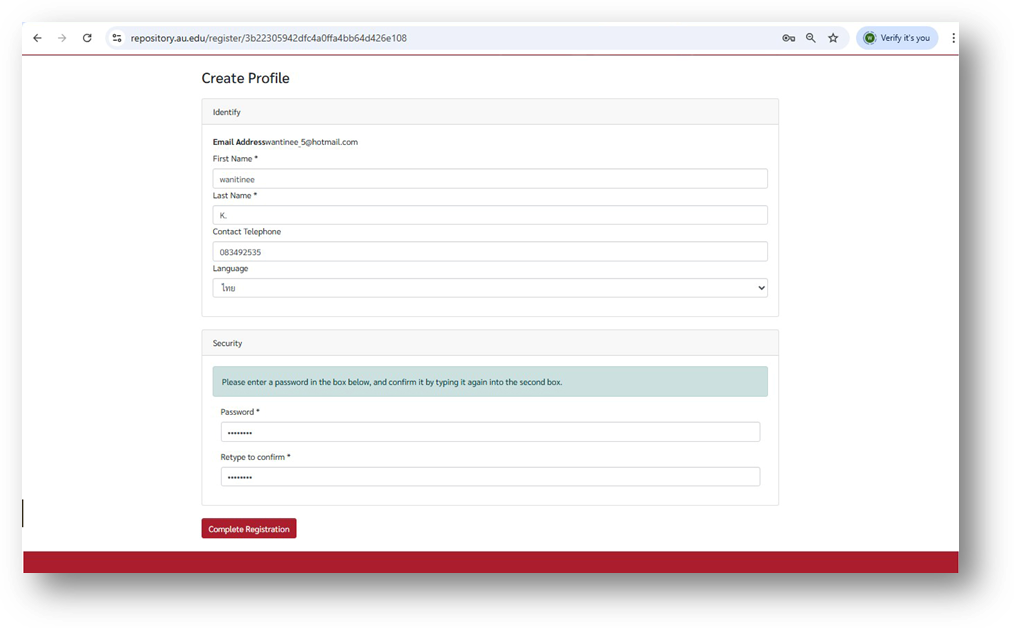
Step 7 — Complete the Form
Fill in all required details and click Complete Registration.
Step 8 — Await Approval
✅ Your registration is complete!
Please wait for the system administrator to approve your account.
Submission AU-IR
How to Submit to AU-IR
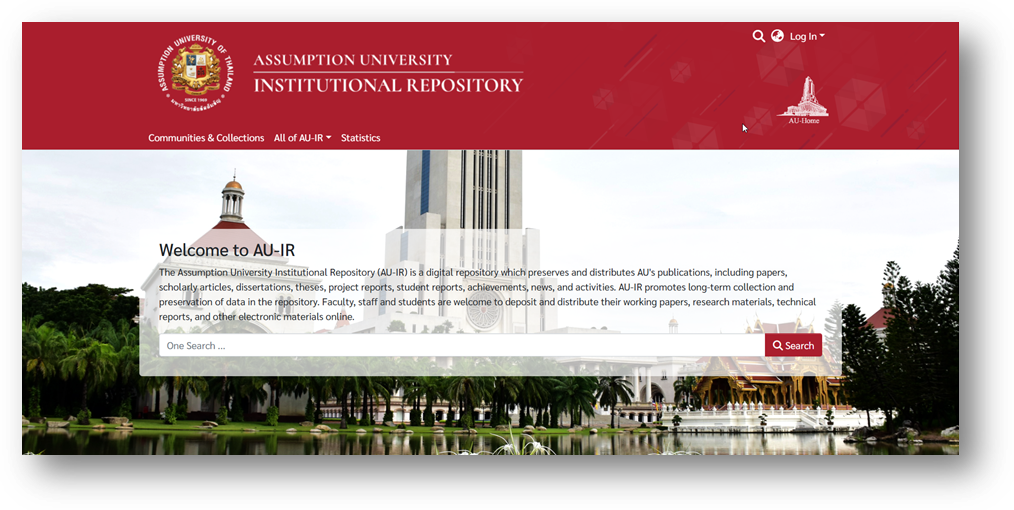
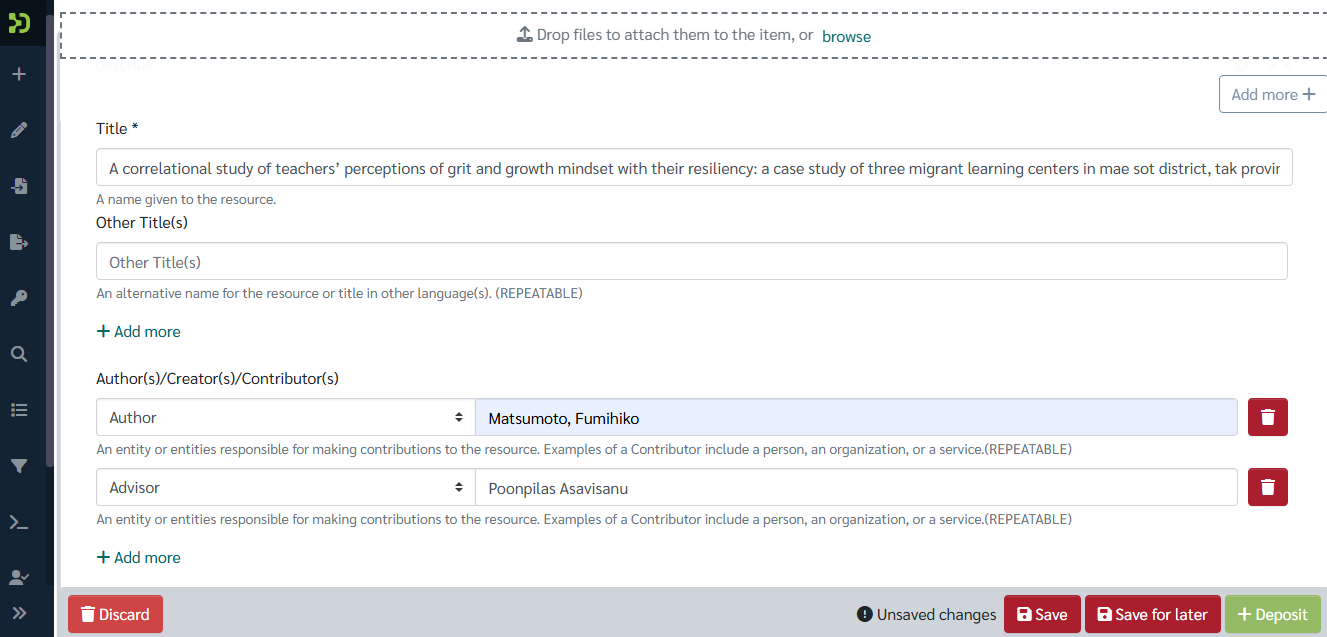
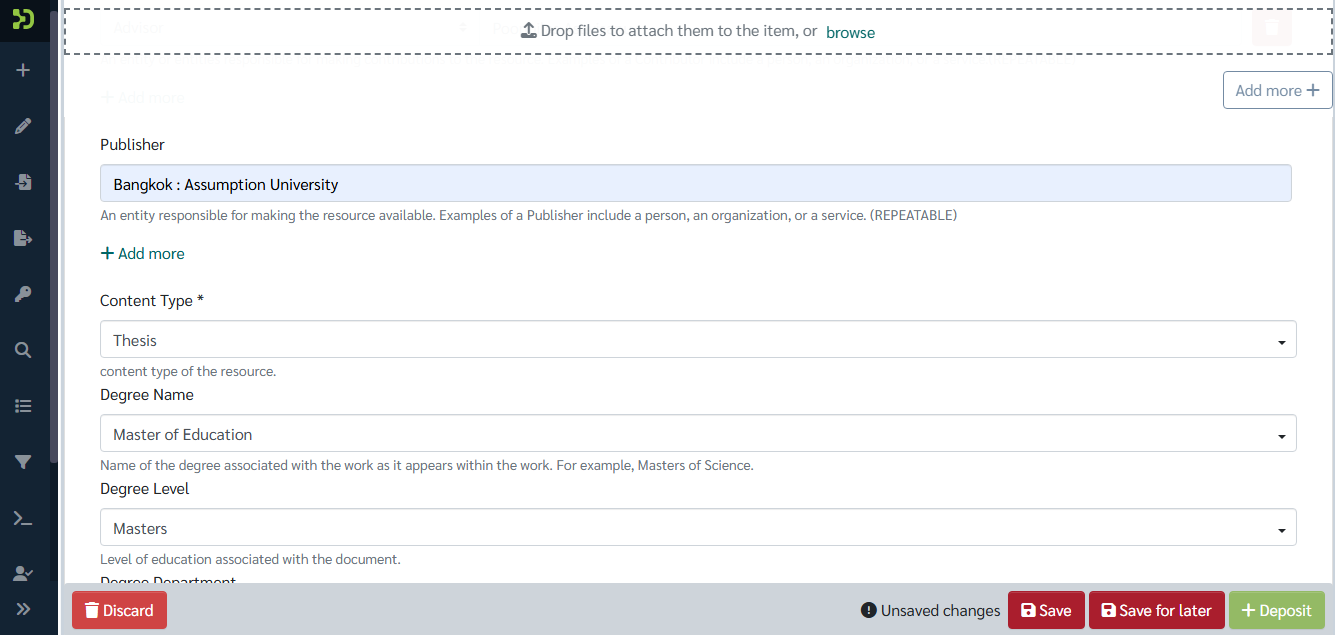
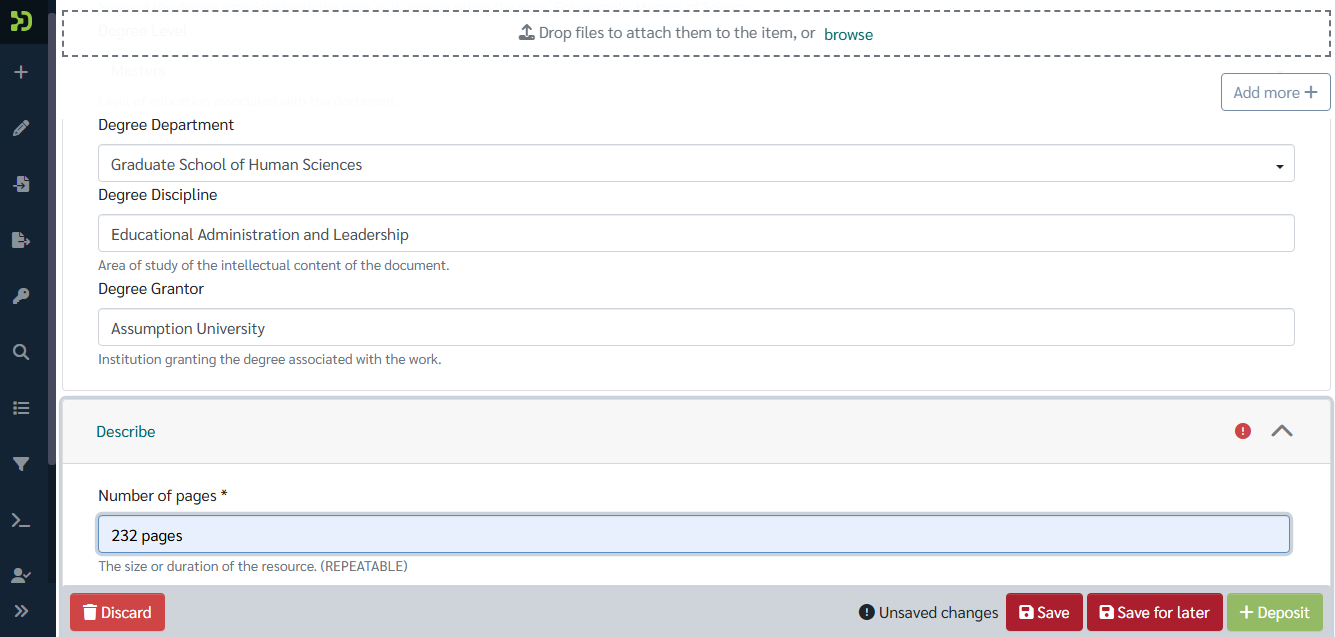
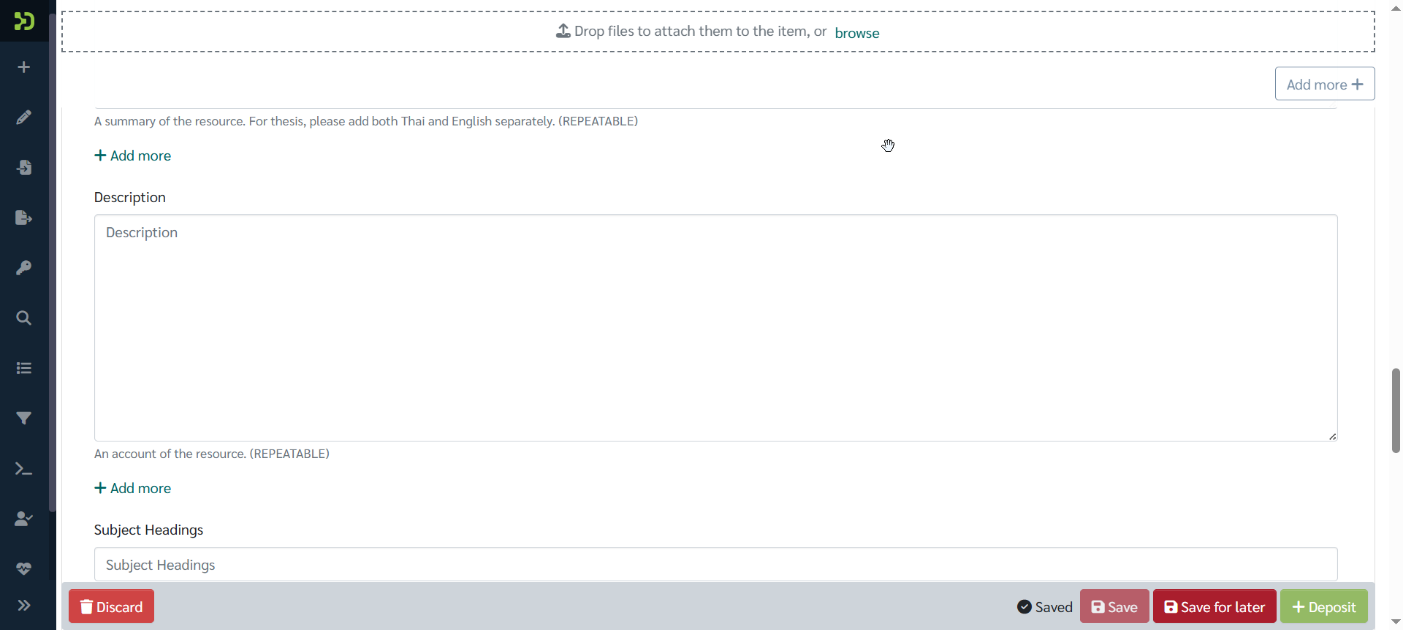
The Assumption University Institutional Repository (AU-IR) provides a self-submission service for academic works by AU personnel, including both academic and support staff, who wish to contribute and disseminate their scholarly output through the repository.
Step 1 — Access AU-IR
Go to the AU Institutional Repository at https://repository.au.edu/
Step 2 — Log In
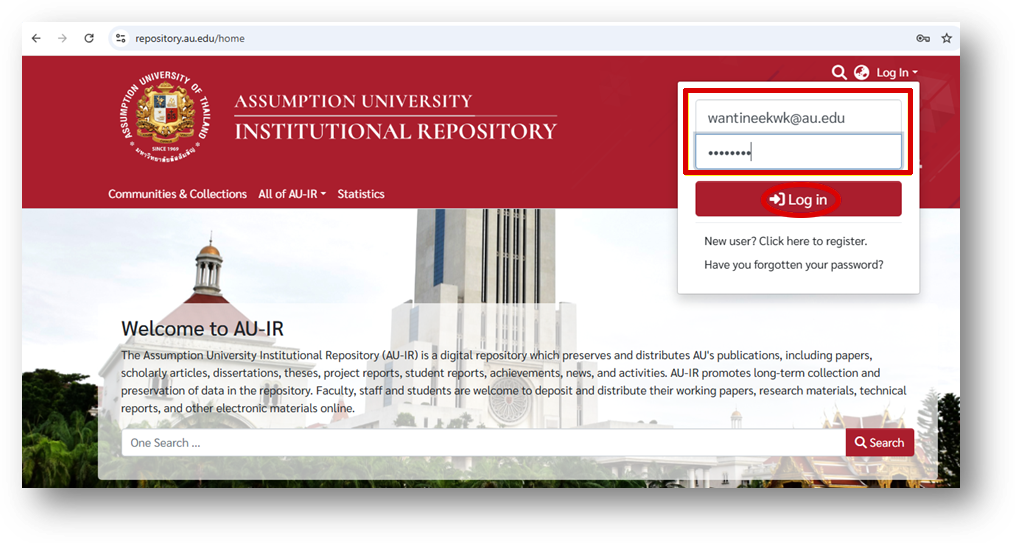
Click “Log In” at the top-right corner of the AU-IR homepage.
Enter your email address and password, then click Log in to confirm your account.
Step 3 — Start a New Submission
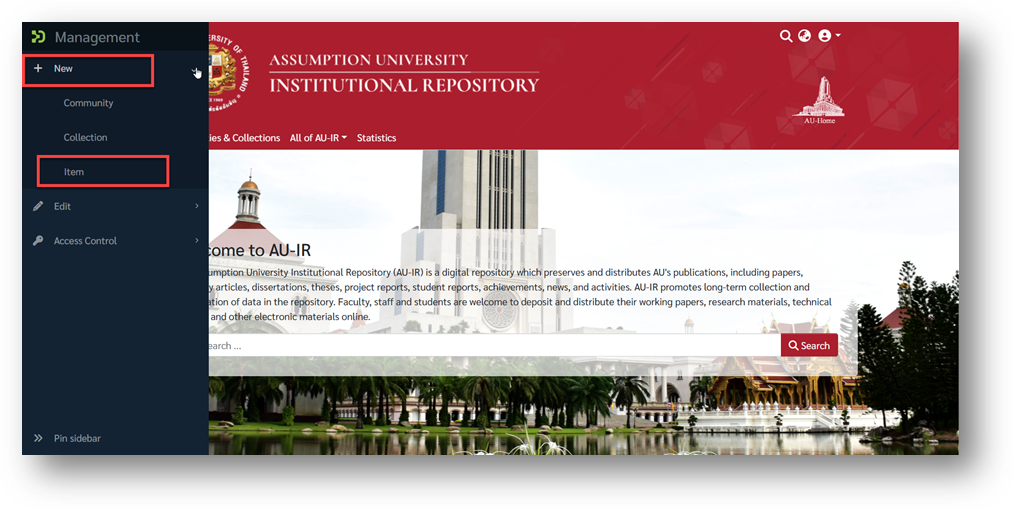
From the left-hand menu, select “New Submission” and then click “Item.”
Step 4 — Choose the Right Collection
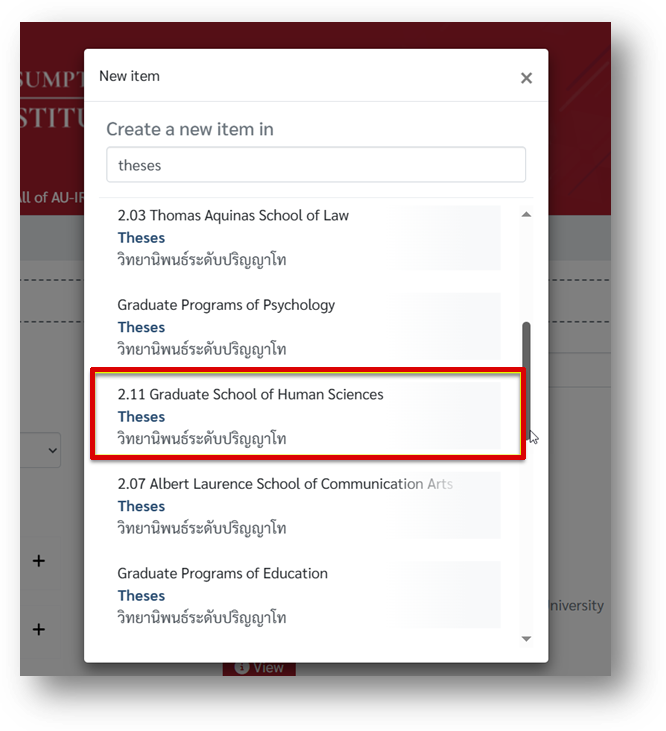
If you are submitting a Thesis, type the keyword “Theses” or “วิทยานิพนธ์ระดับปริญญาโท” in the “Create a new item in” field, then select the appropriate community and collection.
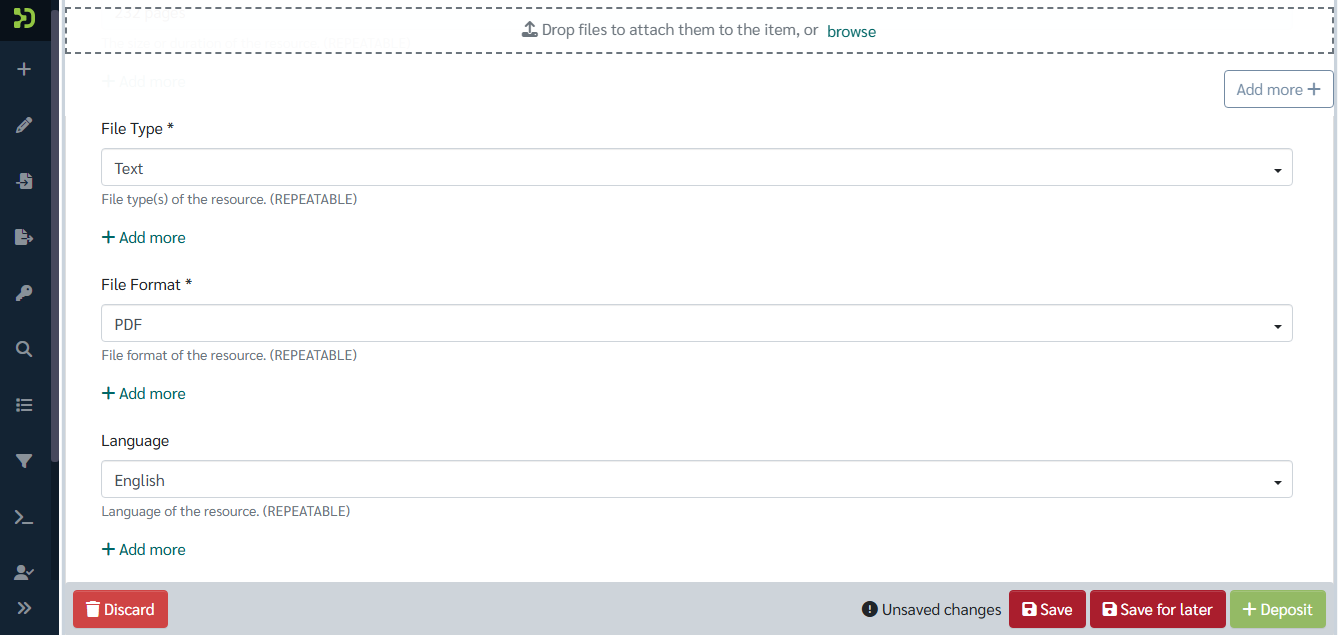
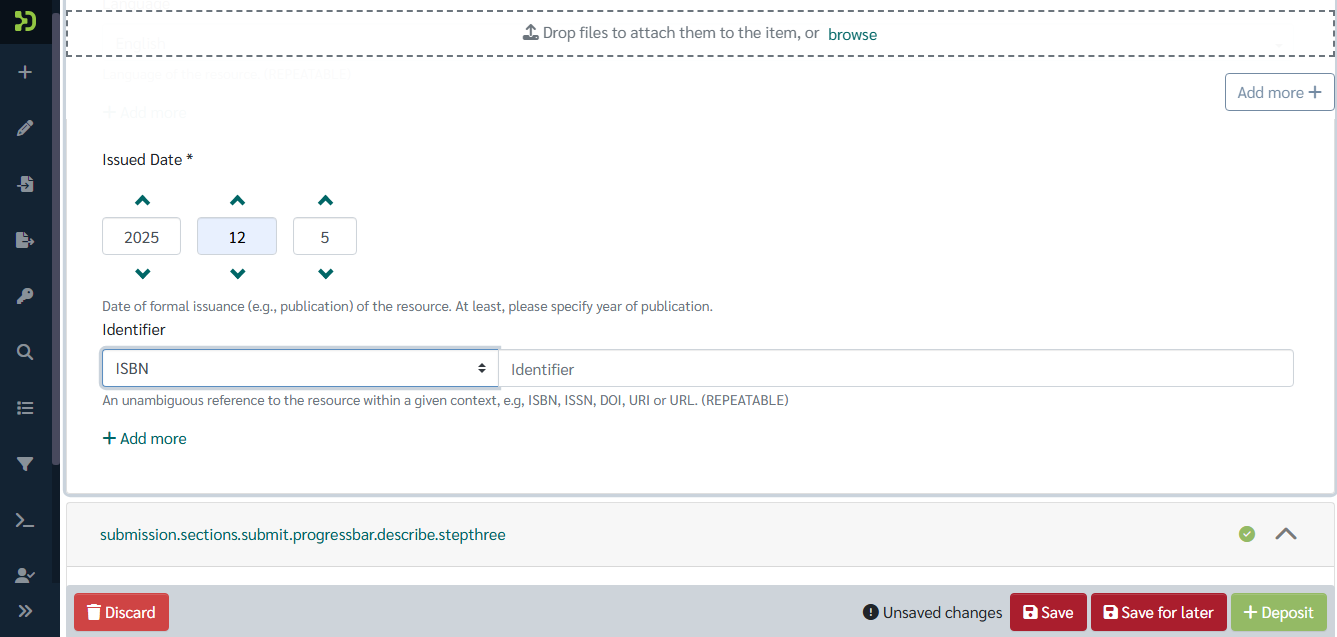
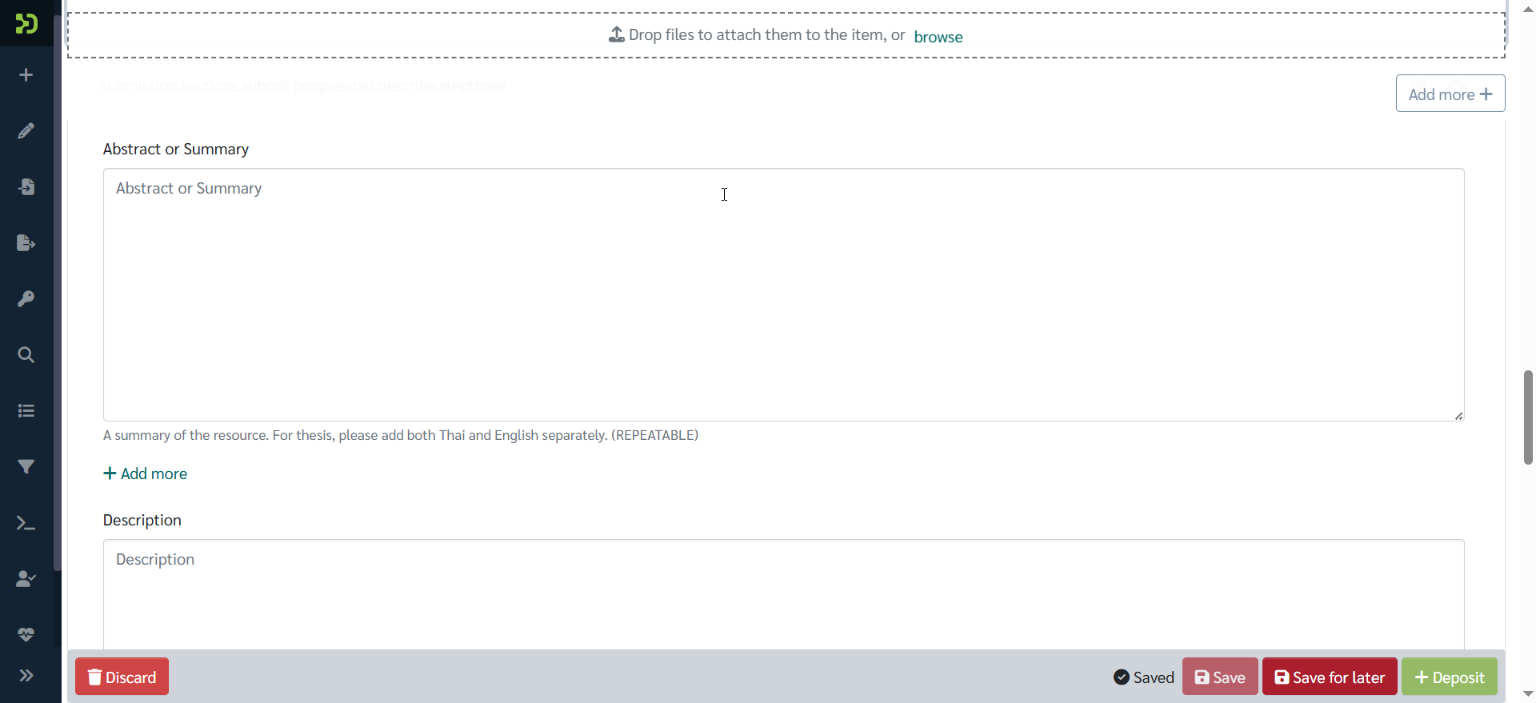
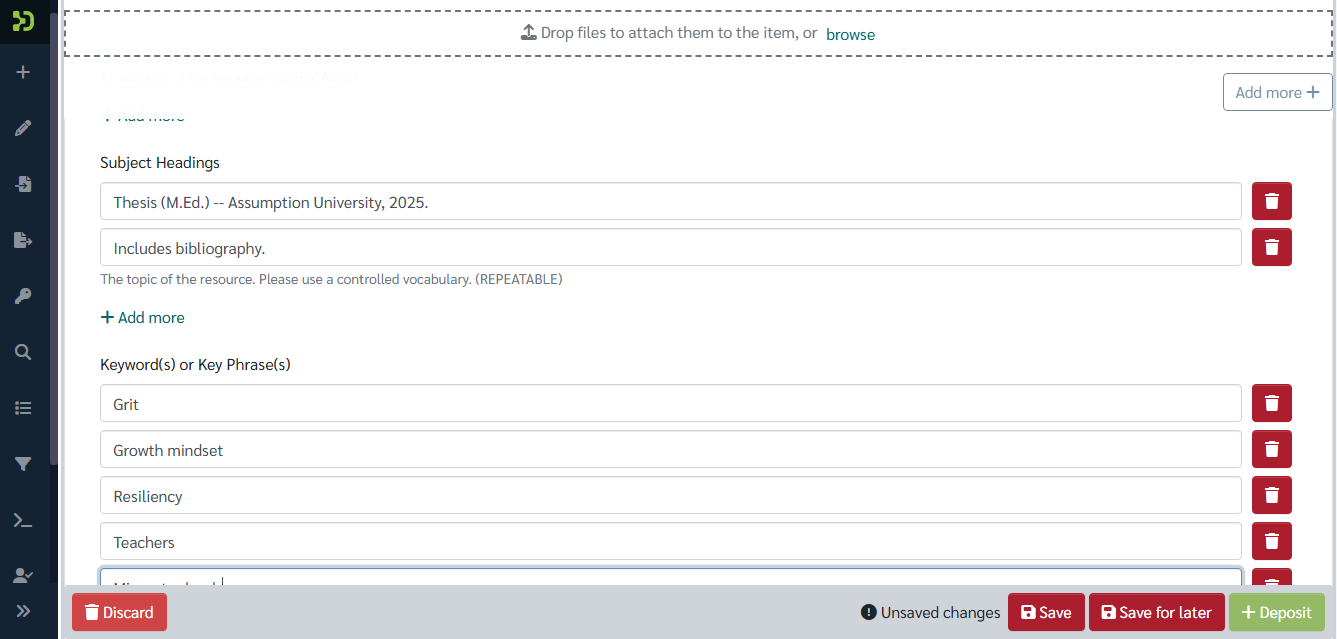
Step 5 — Describe and Upload
Once you’ve selected the collection, the metadata submission form will appear.
-
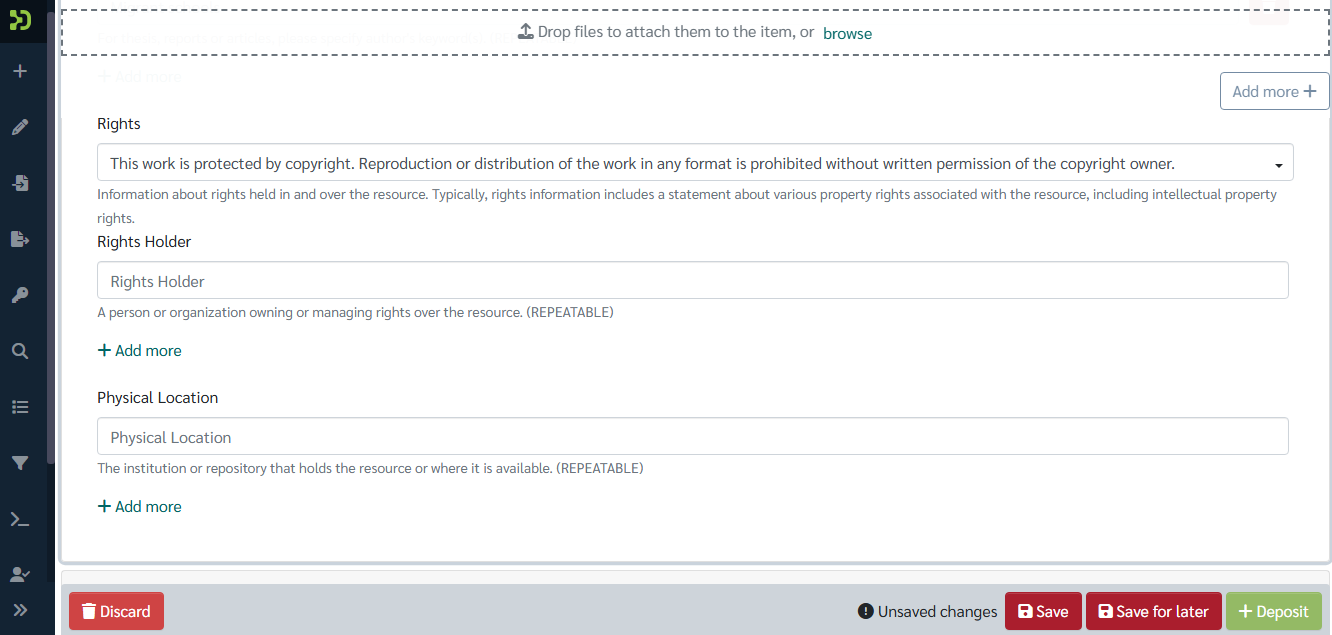
- Fill out the Describe Item section completely.
- Upload your files.
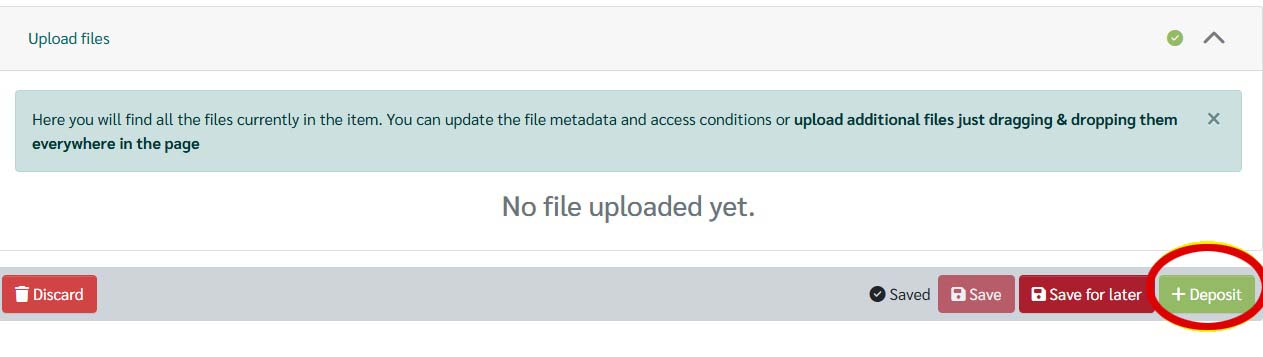
When all required information is entered, click “Deposit” to finalize your submission.
Step 6 — Submission Complete!
Your item has been successfully submitted to the AU-IR.
It will now be reviewed and made available for others to access and cite.
Search AU - IR
 Download the User Manual
Discover academic works, research papers, and collections with ease.
Information Retrieval
Searching within the Assumption University Institutional Repository (AU-IR) can be done in four main ways:
- Search Menu
- Communities & Collections
- All of AU-IR (Browse & Search)
- Quick Search
Method 1 — Search Menu
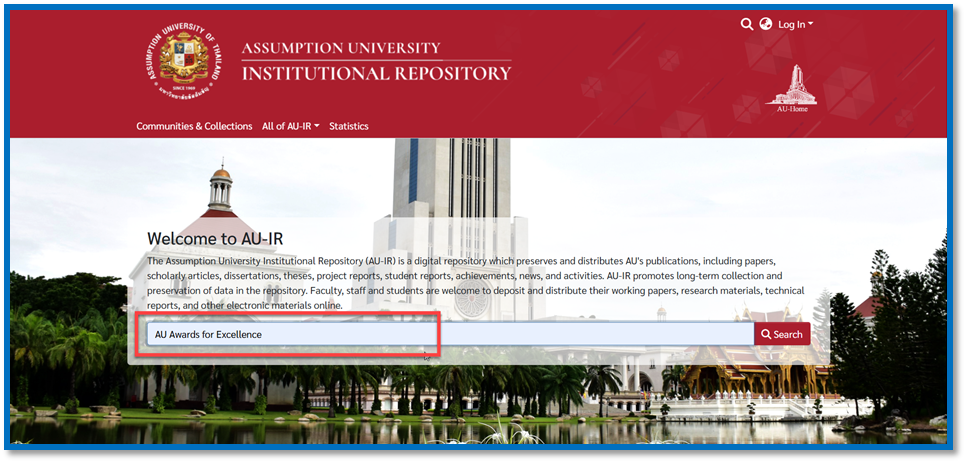
One Search
1) Type your keyword into the Search box.
2) Click “Search” to view results instantly.
Tip: Use specific keywords for better accuracy.
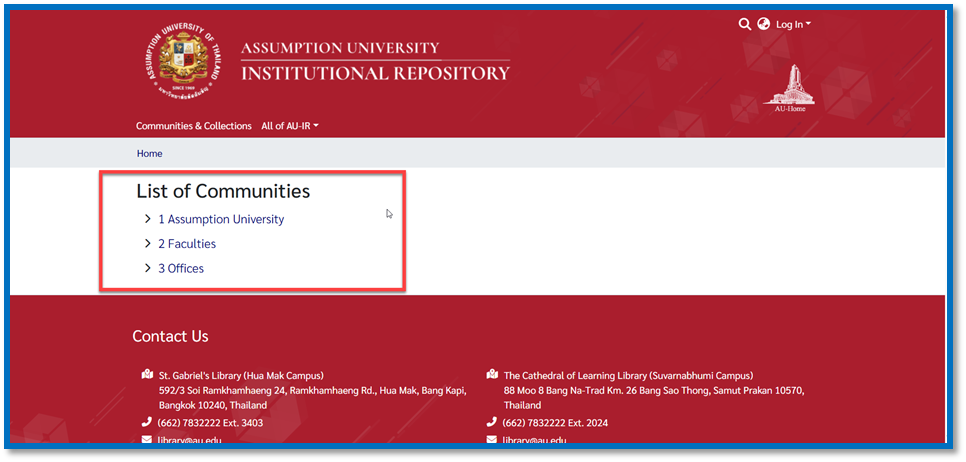
Method 2 — Communities & Collections
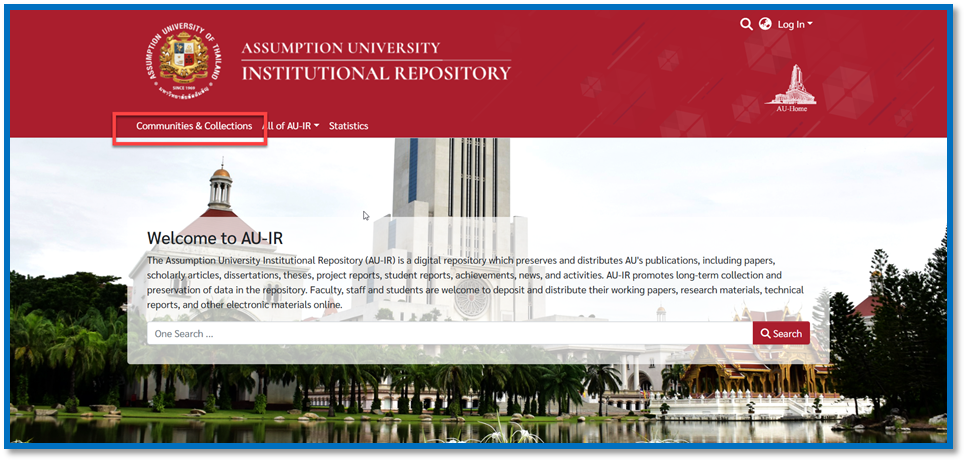
Communities & Collections: This menu allows users to browse information based on the data structure by clicking to view each section.
1) Click “Communities & Collections.”
2) Under the Communities & Collections menu, you will find a list of communities that gather research works, academic publications of faculty members from all faculties and institutes, as well as various university activities. The works are categorized as follows: papers, scholarly articles, dissertations, theses, project reports, student reports, achievements, news, and activities. Faculty, staff and students are welcome to deposit and distribute their working papers, other scholarly outputs.
Three main sections include:
- Assumption University
- Faculties
- Offices
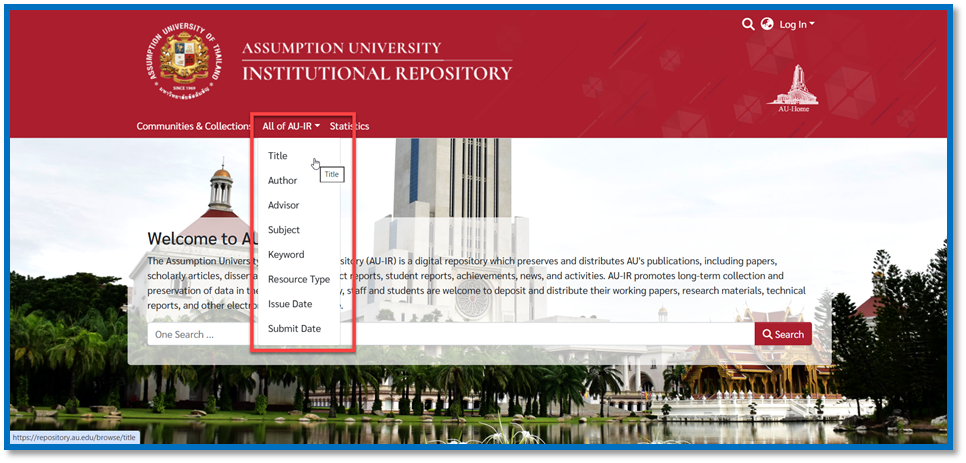
Method 3 — All of AU-IR (Browse & Search)
Click the “All of AU-IR” menu, then a drop-down list will appear, allowing you to browse the following submenus:
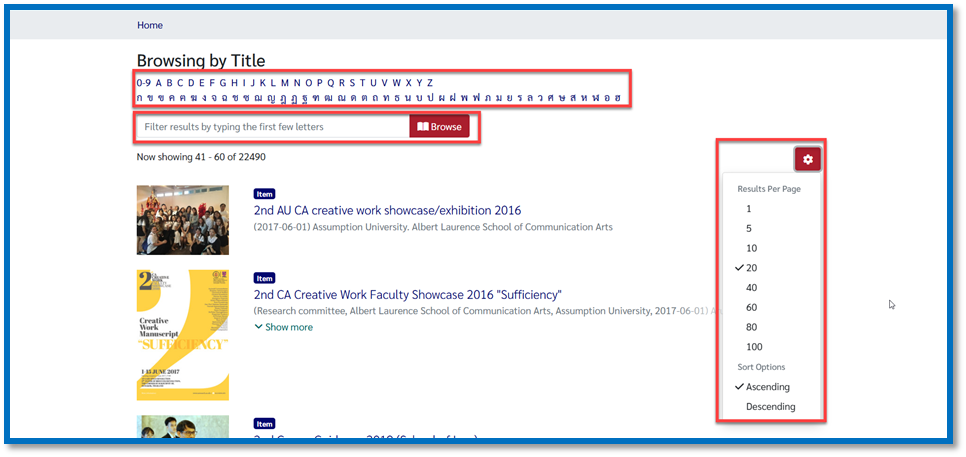
Title: Search by Titles
Users can browse items by Title using the following options:
- Click the initial letter of the title from the alphabetical list, or
- Filter results by typing the first few letters and click Browse.
- Select the number of results displayed per page and choose the display order — either ascending (A–Z) or descending (Z–A).
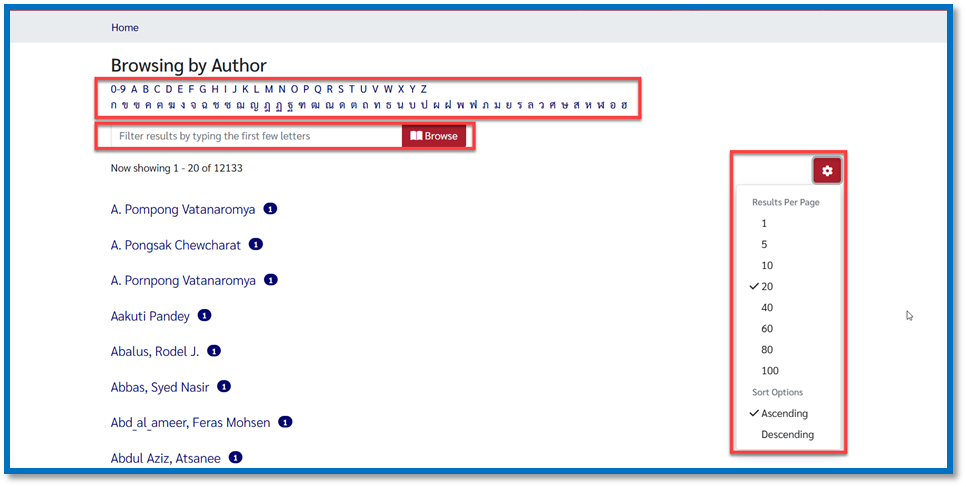
Author: Search by Author
Users can browse items by Author using the following options:
- Click the initial letter of the author’s name from the alphabetical list, or
- Filter results by typing the first few letters and click Browse.
- Select the number of results displayed per page and choose the display order — either ascending (A–Z) or descending (Z–A).
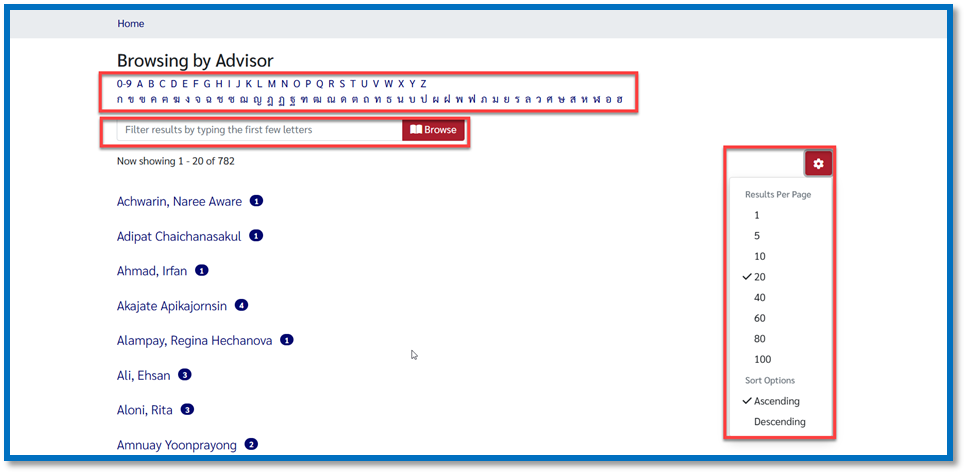
Advisor: Search by Advisor
Users can browse items by Advisor using the following options:
- Click the initial letter of the advisor’s name from the alphabetical list, or
- Filter results by typing the first few letters and click Browse.
- Select the number of results displayed per page and choose the display order — either ascending (A–Z) or descending (Z–A).
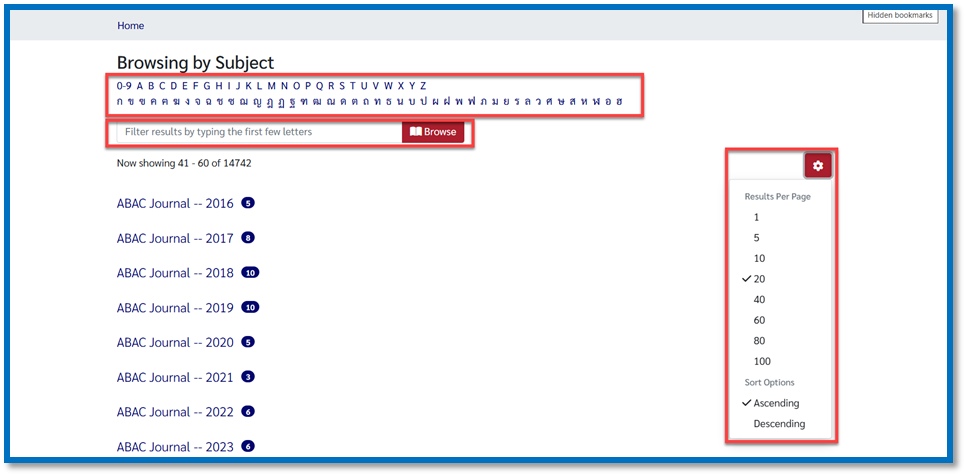
Subject: Search by Subject
Users can browse items by Subject using the following options:
- Click the initial letter of the subject from the alphabetical list, or
- Filter results by typing the first few letters and click Browse.
- Select the number of results displayed per page and choose the display order — either ascending (A–Z) or descending (Z–A).
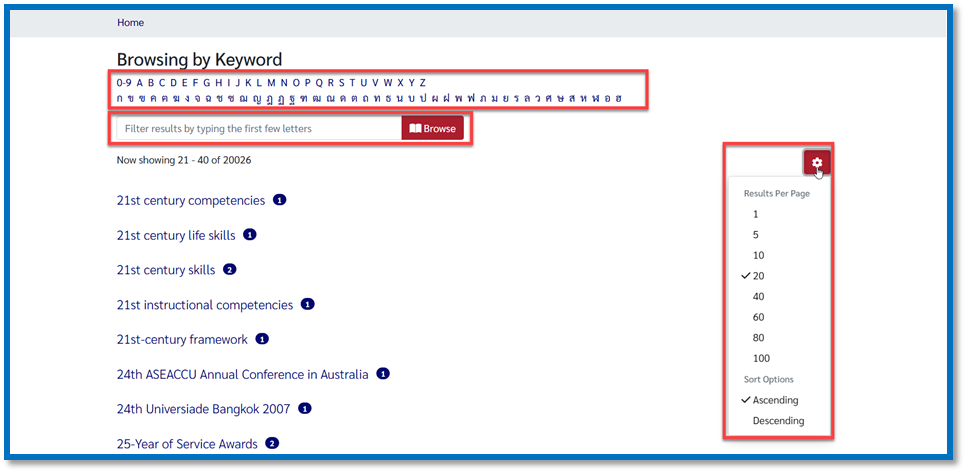
Keyword: Search by Keyword
Users can browse items by Keyword using the following options:
- Click the initial letter of the keyword from the alphabetical list, or
- Filter results by typing the first few letters and click Browse.
- Select the number of results displayed per page and choose the display order — either ascending (A–Z) or descending (Z–A).
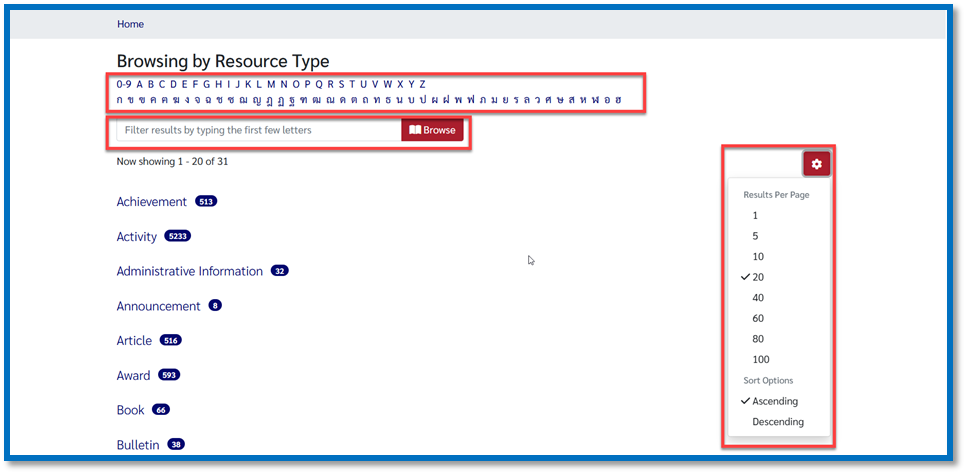
Resource Type: Search by Resource Type
Users can browse items by Resource Type using the following options:
- Click the initial letter of the resource type from the alphabetical list, or
- Filter results by typing the first few letters and click Browse.
- Select the number of results displayed per page and choose the display order — either ascending (A–Z) or descending (Z–A).
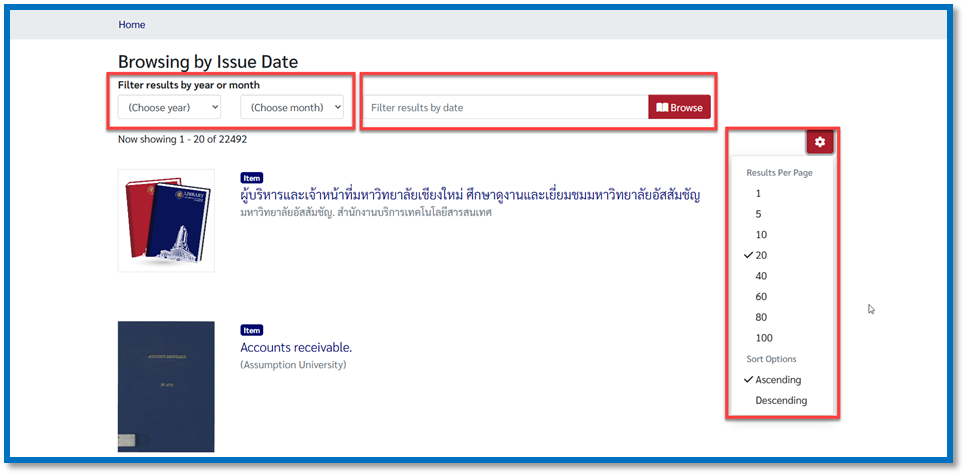
Issue Date: Search by Issue Date
Users can browse items by Issue Date using the following options:
- Select the year and month you wish to browse.
- Filter results by date and click Browse.
- Select the number of results displayed per page and choose the display order — either ascending (oldest to newest) or descending (newest to oldest).
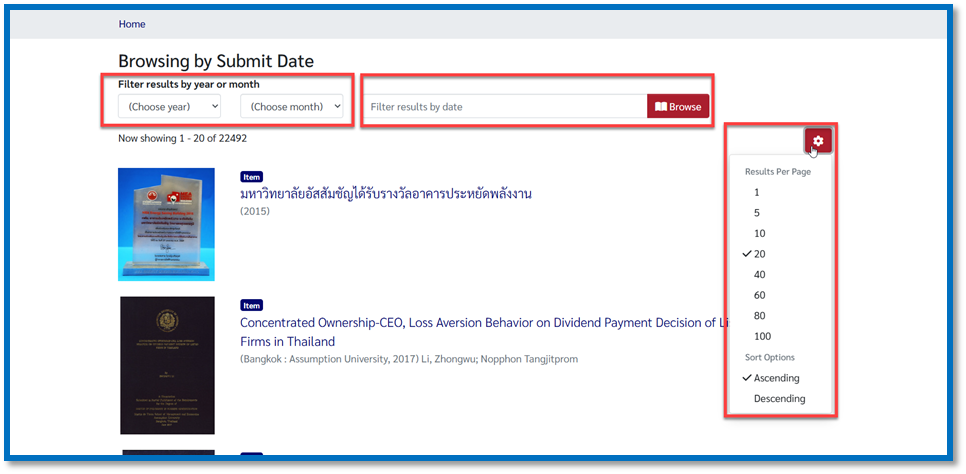
Submit Date: Search by Submit Date
Users can browse items by Submit Date using the following options:
- Select the year and month you wish to browse.
- Filter results by date and click Browse.
- Select the number of results displayed per page and choose the display order — either ascending (oldest to newest) or descending (newest to oldest).
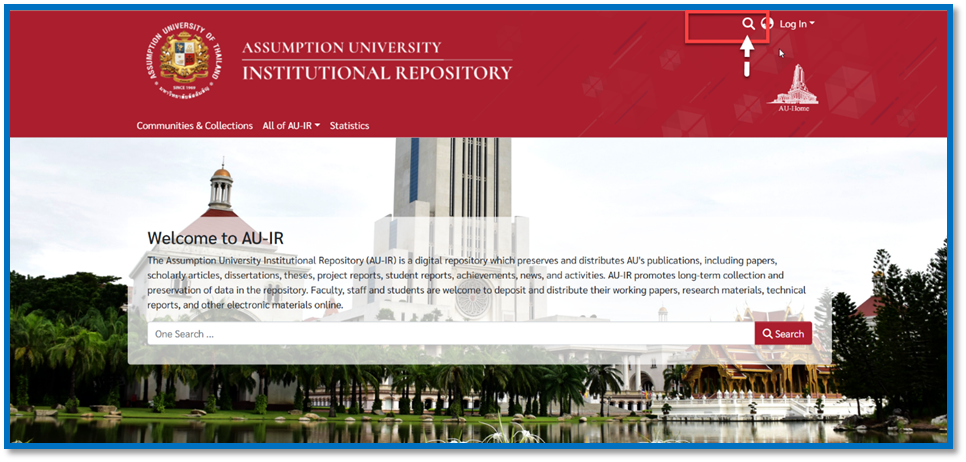
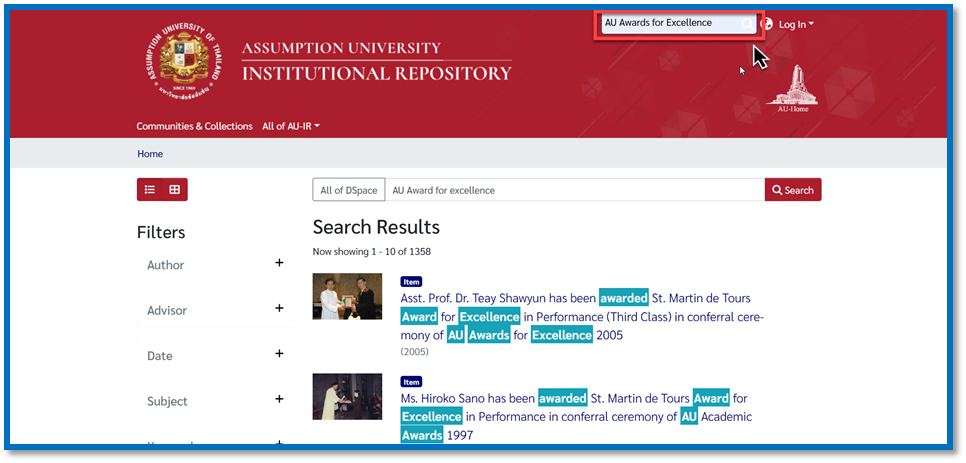
Method 4 — Quick Search
1) Click “Quick Search” at the top-right corner of the page.
2) Type your keyword in the search box and press Enter to search instantly.
Results
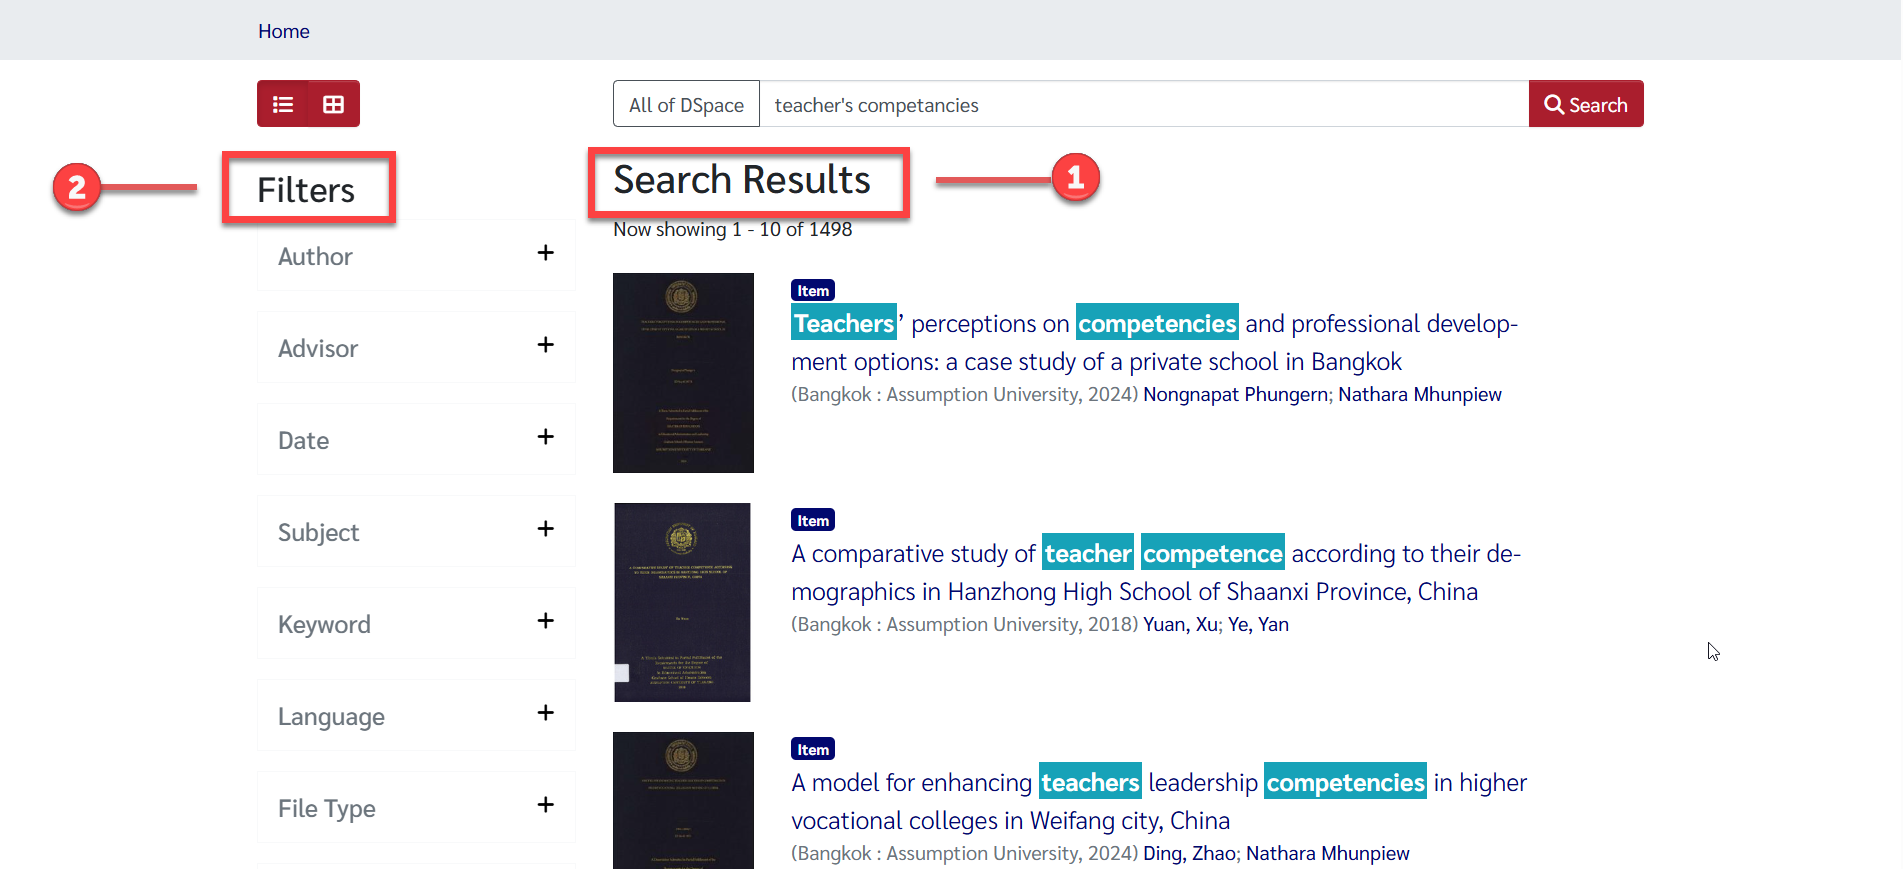
The Search Results section shows items matching your search. Users can click any item to view details or download the file. The results page consists of three main sections:
1. Search Results
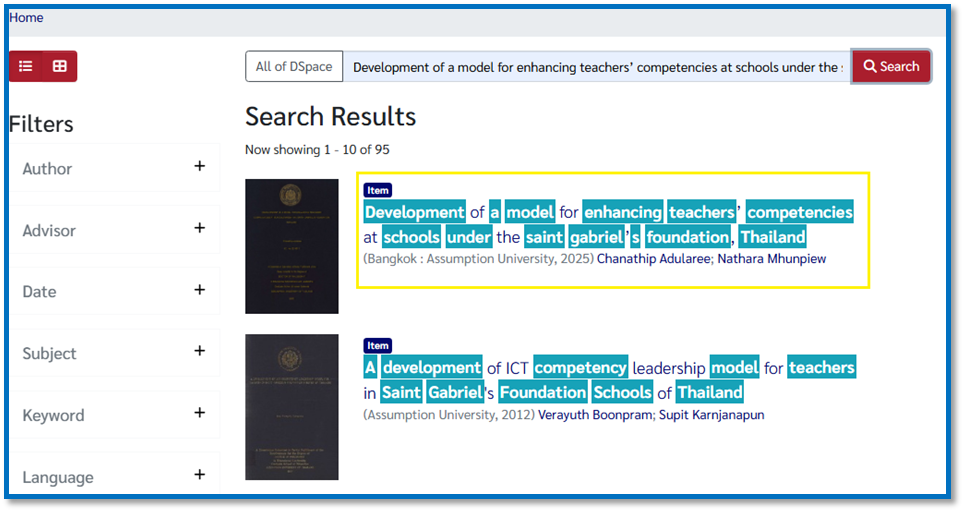
This section displays a list of items retrieved from the search.
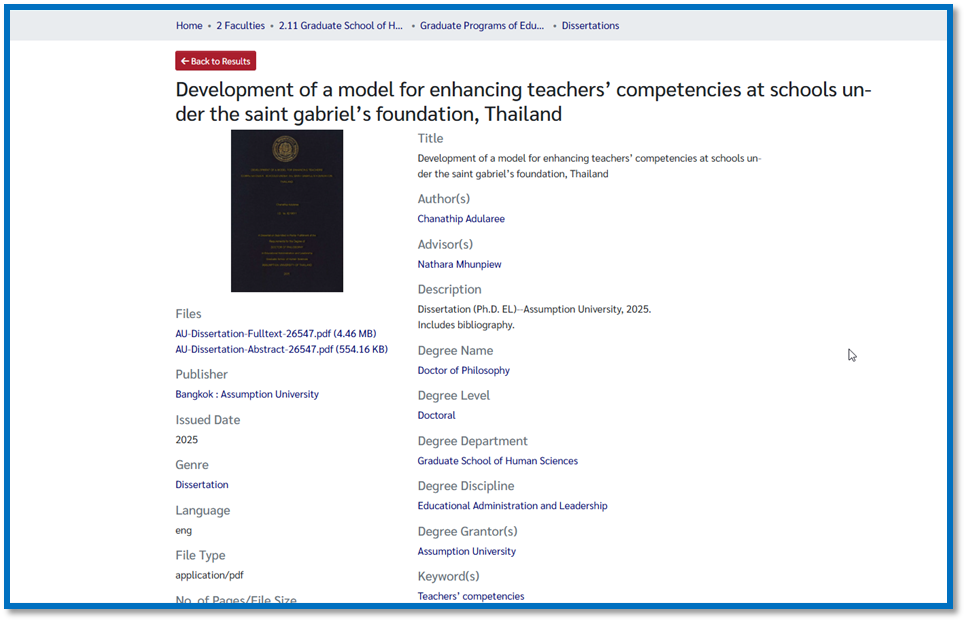
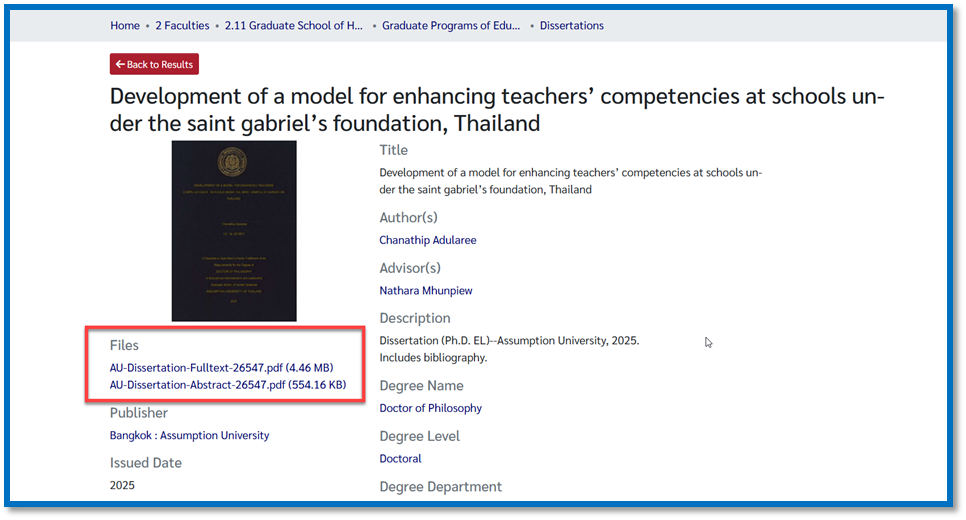
1) Select an item to view its details and open or download the desired document.
2) The system will then display the item’s information page with full details and access to the complete document file.
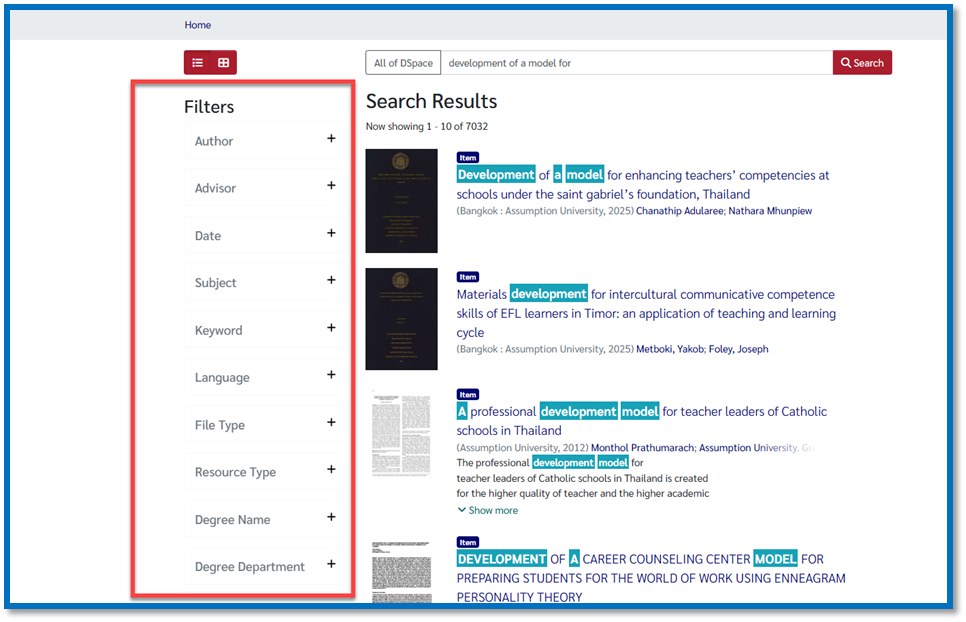
2. Filters (Refine Your Search)
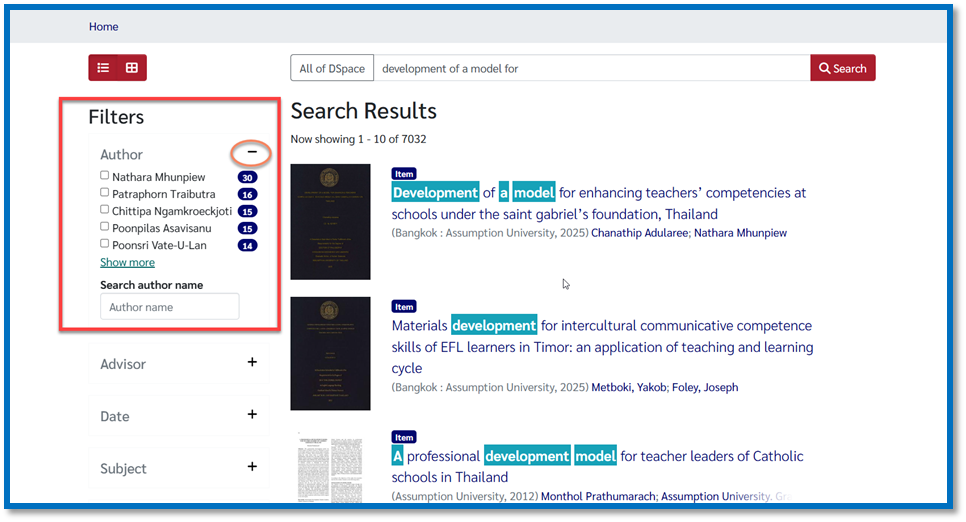
1) After completing a search, the system displays the filter panel on the left side of the screen.
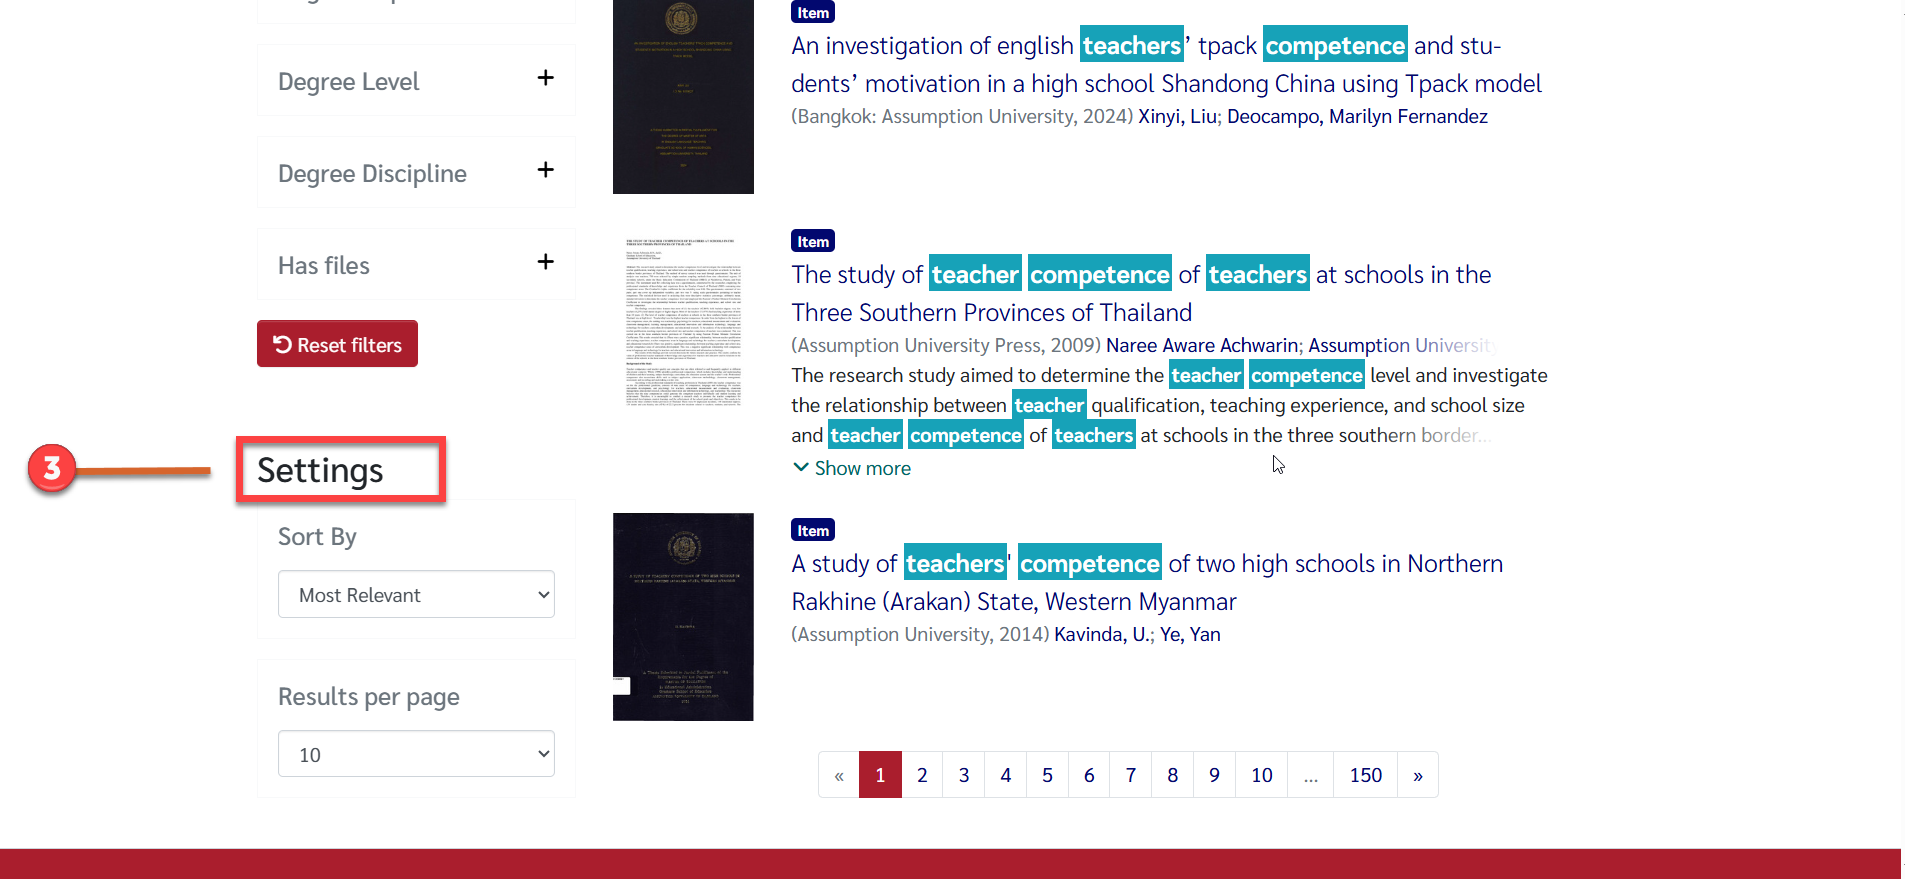
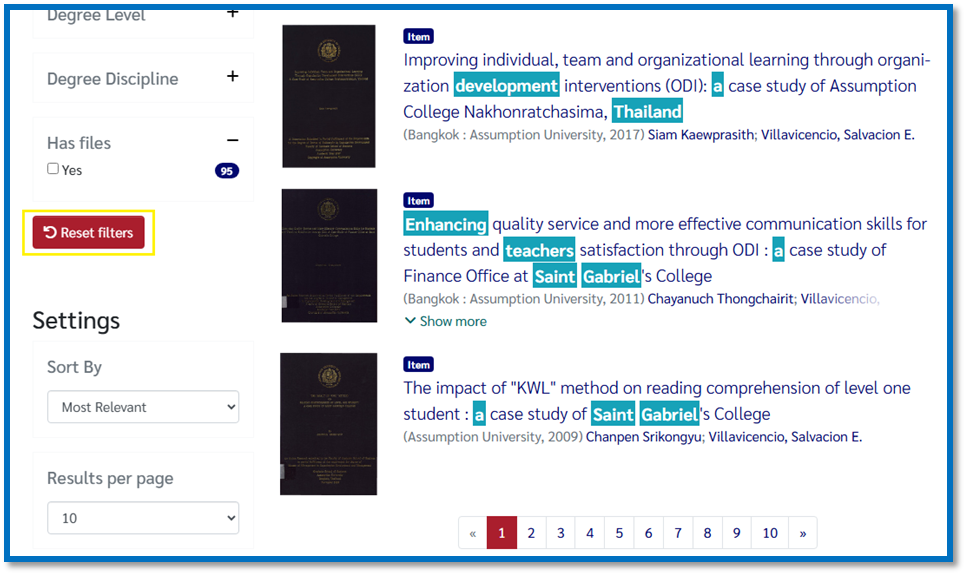
Users can refine their search results in various ways, such as by Author, Advisor, Subject, Date issued, Resource type, or Has files, etc.
2) Click “+” to expand each filter.
3) To reset your search, click “Reset filters.”
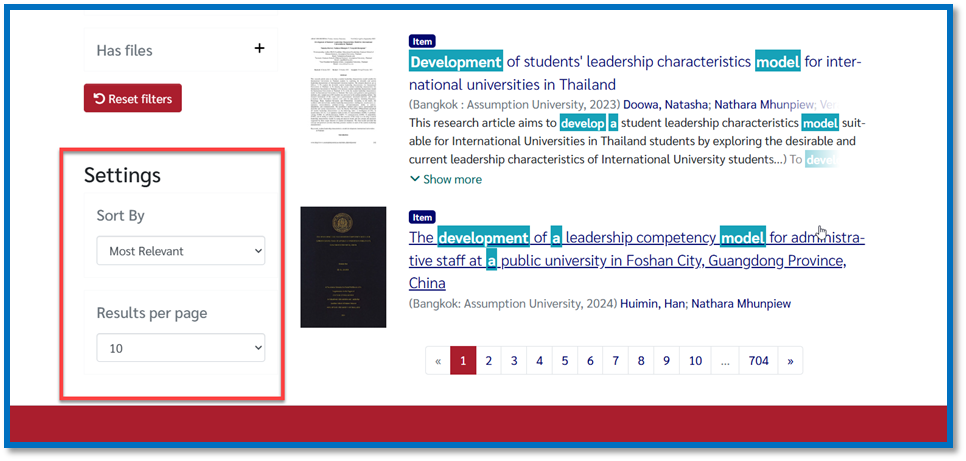
3. Settings
Customize your results view:
1) Sort by: Most Relevant | Title Ascending | Date Issued Descending | Accessioned Date Descending
2) Results per page: Choose how many results to display per page.
4. Save and Download
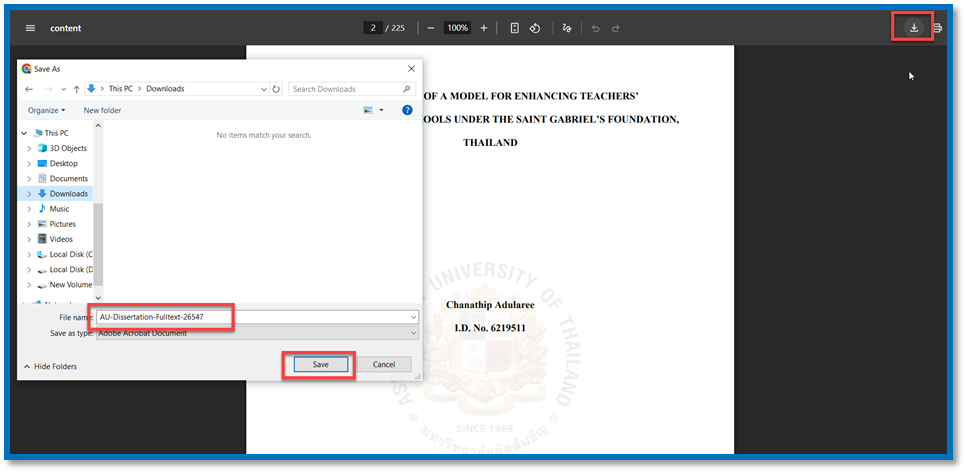
1) To view or download the full-text file attached to an item, click on the provided link.
2) Click here to save or show PDF file.